
At Points West Community Bank, we’re always working to make your banking experience straightforward and dependable. We’re thrilled to announce a significant enhancement that many of you have been looking forward to: E-Statements will soon be available directly within our mobile banking app!
This exciting update, set to arrive on July 14th, brings a new level of convenience to managing your financial documents. Along with improvements to our online banking platform, you’ll now have a much more efficient way to access your monthly statements and other important documents. Gone are the days of needing to pull one statement at a time; soon, you’ll have the flexibility to view all your accounts in one clear place, select any time period you need, and easily manage your E-Statements, all designed to better support your financial management.
We believe in providing tools that are both effective and easy to use. Let’s walk through how to view bank statements online and in your mobile banking app.
Accessing Your Statements & Documents on the Go with Our Mobile App (Coming July 14th!)
This new feature brings a powerful, centralized view right to your fingertips, ensuring you can manage your banking documents no matter where you are.
Method 1: A Consolidated View for All Your Accounts
This is often the most efficient way to review documents across all your accounts directly from your phone.
- Log in to the Mobile App: Open and log in to the Points West Community Bank mobile app.
- Tap ‘More’ in the Footer Menu: Look for the ‘More’ option in the bottom right corner of your screen and tap on it.
- Select ‘View Statements & Documents’: From the ‘More’ menu, choose ‘View Statements & Documents’. This is your direct path to all your digital financial records.
- Use Filters to Find What You Need: On the ‘View Statements’ screen, you’ll find easy-to-use filter boxes. These are here to help you quickly pinpoint the exact documents you’re looking for:
- Accounts: You can choose to view ‘All Accounts’ or select a specific account.
- Time Period: Choose from common periods like ‘Last 30 Days’ or ‘Last 6 Months’, or set a custom range.
- Document Type: Filter specifically for ‘Account Statement’ or other banking documents.
Manage Your E-Delivery Preferences: From this very same screen, you can also thoughtfully manage your E-Delivery preferences. Just tap on ‘Manage All E-Delivery Settings’ toward the top of the screen. A window will appear where you can select the accounts you’d like to receive electronic statements for. Simply check the boxes next to your chosen accounts and tap ‘Save’. It’s a simple, responsible step toward managing your documents digitally.


Method 2: Accessing Documents for a Specific Account
If you’re focused on documents for just one account, here’s a reliable path directly from your accounts list:
- Select Your Account from the Home Screen: From your mobile app’s main accounts screen, simply tap on the name of the individual account you wish to access.
- Tap ‘View Statements’: Once you’ve selected an account, you’ll see its activity details. Look for the ‘View Statements’ icon (or similar button) and tap on it.
- View and Manage for the Selected Account: Here, you can view statements and documents exclusively for the account you’ve chosen. You’ll have the option to select the desired timeframe and document type, and manage E-Statement preferences for that specific account.
Improved Statement Viewing in Online Banking
While the mobile app is getting this brand-new feature, we’re also making significant improvements to digital banking statement viewing when you access online banking through your web browser. The new viewing screen now mirrors the flexibility and ease you’ll find in the mobile app, replacing the previous method of searching one statement at a time.
Method 1: A Consolidated View for All Your Accounts (Our Recommended Approach)
This method is the most efficient way to manage documents across all your accounts.
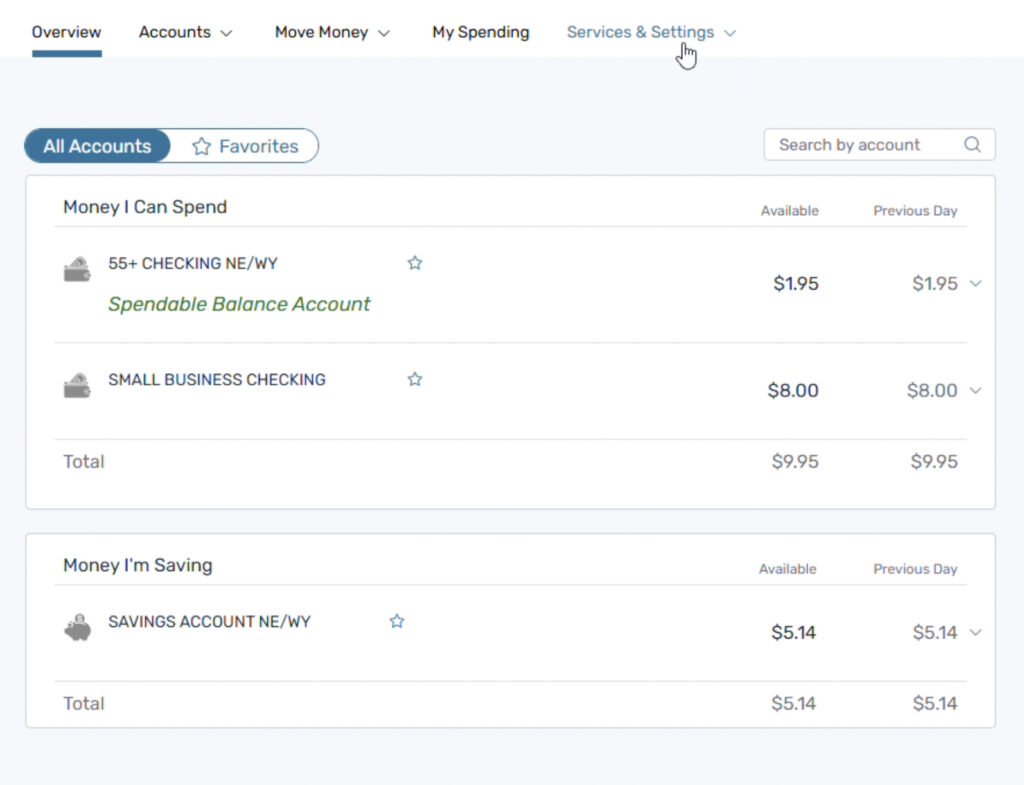
Step 1: Head to ‘Services & Settings’After you’ve logged into your online banking, you’ll see your main accounts overview. Just look for ‘Services & Settings’ in the header menu at the top of the page and give it a click.
Step 2: Find ‘View Statements & Documents’. A menu will gently unfold. From this list, please choose ‘View Statements & Documents’. This is your direct path to all your digital financial records.

Step 3: Use the Filters to Find What You Need
On the ‘View Statements & Documents’ page, you’ll find easy-to-use filter boxes. These are here to help you quickly pinpoint the exact documents you’re looking for:
- Accounts: You can view ‘All Accounts’ or select a specific one.
- Time Period: Choose from common periods like ‘Last 30 Days’ or ‘Last 6 Months’, or set a custom range.
- Document Type: Filter specifically for ‘Account Statement’ or other document types.

These options are built to help you manage your records with ease.
Step 4: Manage Your E-Delivery Preferences
From this very same screen, you can also thoughtfully manage your E-Delivery preferences. Just look for the ‘Manage All E-Delivery Settings’ link, on the right side of the page.

Clicking this will bring up a clear window where you can select which accounts you’d like to receive electronic statements for. Simply check the boxes next to your chosen accounts and click ‘Save’. It’s a simple, responsible step toward managing your documents digitally.

Method 2: Accessing Documents for a Specific Account
If you’re focused on documents for just one account, here’s a reliable path:
Step 1: Select Your Account from the Home Screen
From your main accounts screen, simply click on the name of the individual account you wish to access (e.g., “55+ Checking” or “Small Business Checking”).

Step 2: Go to ‘Statements & Documents’ within the Account View
Once you’ve clicked on an account, you’ll see its activity details. In the menu specific to this account, you’ll find the ‘Statements & Documents’ tab. Click on this.

Step 3: View and Manage for the Selected Account
Here, you can view statements and documents exclusively for the account you’ve chosen. You’ll also have the option to select the desired timeframe and manage E-Statement preferences for that specific account, including the ability to toggle e-delivery on or off and access broader e-delivery settings.

The Value of E-Statements
Choosing electronic statements offers several practical benefits that align with responsible management:
- Convenience: Access your statements securely, anytime you need them, without waiting for the mail.
- Security: Help protect your sensitive information by reducing paper documents in transit.
- Responsibility: It’s a simple way to contribute to more sustainable practices.
- Organization: Keeps your financial records neatly arranged and easily searchable in one digital location.
We believe these updates will provide you with a more efficient and reliable banking experience. Should you have any questions or require assistance, please do not hesitate to contact us. We are here to help!